This article for uploading images by Django I will provide you with a complete understanding of the image upload mechanism in Statch.
Concepts that you need to understand:
A POST request is used for data upload. It can be an image, file, or text. Although PUT or PATCH requests are used for data uploading, they are generally used for updating data on the server. So in this article, we will learn how to upload data using a POST request.
In frontend, form is used for POST request. Also using form you can do GET, POST, PUT etc requests.
In backend, We need a end point (Django view or api) that can accept the POST request and process data in server. Here are three tasks:
- Verify form data
- Save image in server storage
- Lastly, save the image relative path in database
Those three tasks are automated by the Django form. That's why the Django form is very useful for POST requests. Also, you can do it manually without Django Forms.
Prerequisites:
- Basic Knowledge of Django like django app, models, urls etc
- Basic knowledge about HTML
Project folder structure:
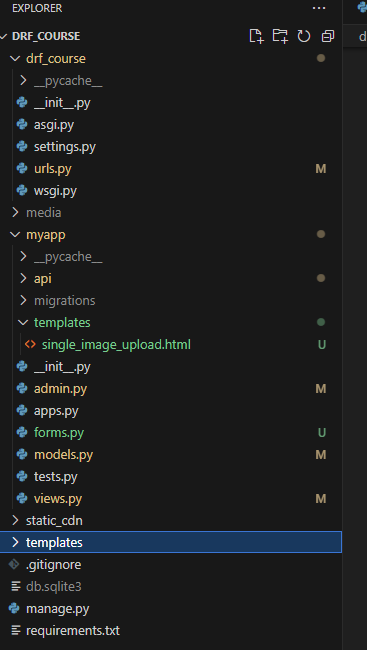
This is a demo project structure. I developed it for you to write this article. It is for your understanding about template directories. Just notice here the project-level template directory and the app-level template directory position. Also, you should know how the template directory is registered with the project.

Register the template directory in settings.py. As a result, the parentlevel 'templates' directory and the app-level 'templates' directory will be able to serve HTML files as django-templates.
import os
TEMPLATES = [
    {
        "BACKEND": "django.template.backends.django.DjangoTemplates",
        "DIRS": [os.path.join(BASE_DIR, "templates")],
        "APP_DIRS": True,
        "OPTIONS": {
            "context_processors": [
                "django.template.context_processors.debug",
                "django.template.context_processors.request",
                "django.contrib.auth.context_processors.auth",
                "django.contrib.messages.context_processors.messages",
            ],
        },
    },
]
Model:
Define a model in your models.py to store data with images. Use ImageField for storing image information:
class Image(models.Model):
    title = models.CharField(max_length=255)
    image = models.ImageField(upload_to='book_images/')
Form:
Create a file named forms.py in your app. Then create a form named ImageForm by inheriting ModelForm. This form will handle data verification, saving image storage, and saving the path of the image in the database.
from django import forms
from .models import Image
class ImageForm(forms.ModelForm):
    class Meta:
        model = Image
        fields = ['title', 'image']
Template:
Create a template folder according to the project structure above. Then create a file named single_image_upload.html. The necessary codes are below:
<!DOCTYPE html>
<html lang="en">
<head>
    <meta charset="UTF-8">
    <meta name="viewport" content="width=device-width, initial-scale=1.0">
    <title>Image Uploads</title>
</head>
<body>
    <h2>Upload Image</h2>
    {% if message %}
    <p>{{ message }}</p>
    {% endif %}
    <form method="post" enctype="multipart/form-data">
        {% csrf_token %}
        {{ form.as_p }}
        <button type="submit">Upload</button>
    </form>
</body>
</html>
Here, in the body tag, I created an HTML- form using the form tag. Important are method="post" and enctype="multipart/form-data". The method attribute indicates the request type. As we understand it, for data uploading, a POST request is used. Again, we also upload an image, which is a type of file. A file is binary data, and its size is also large compared to text data. So after submitting a POST request, data is transferred from client to server, chunk by chunk. This enctype defines how data will be transferred from client to server. So it's most import for file (image or any kind of file) uploading; the enctype will be multipart/form-data.
View:
Create a view in views.py. Here I created a function base view named single_upload_image_view. You can also use class-based views.
from django.shortcuts import render
from .forms import ImageForm
def single_upload_image_view(request):
    message = None
    if request.method == 'POST':
        form = ImageForm(request.POST, request.FILES)
        if form.is_valid():
            form.save()
            message = 'Image uploaded successfully!'
    else:
        form = ImageForm()

    context = {'form': form, 'message': message}
    return render(request, 'single_image_upload.html', context)
When we access a link by browser, it makes a GET request and POST, PUT, PATCH, etc. requests need HTML- forms. So in view function, we also need to handle GET and POST requests. That's why if requested method == 'POST' then we receive the form data and do further processing. Otherwise, just return the empty form. This empty form automatically creates a form input variable inside the template.
URL Configuration:
Configure your URLs in urls.py to include the single_upload_image_view function:
from myapp.views import (
    single_upload_image_view
)
urlpatterns = [
    path('image-upload', single_upload_image_view, name='upload_image'),
]
Outputs:
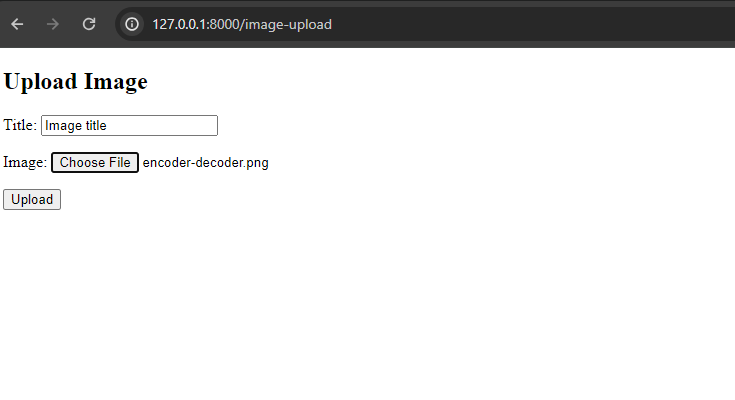
Form before uploading image

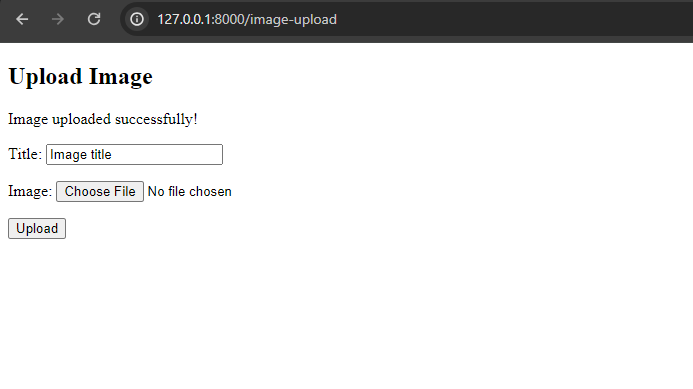
After submitting the form with a success message
